Step-by-Step Guide to Setting Up Burp Suite with Genymotion

Step-by-Step Guide to Setting Up Burp Suite with Genymotion
By thowfickofficial
Step 1: Install Required Tools
Before starting, ensure you have the following installed on your system:
Step 1.1: Install Genymotion (Android Emulator)
Step 1: Download and install Genymotion from Genymotion’s official website.
Step 2: Create an account and log in.
Step 3: Download the Genymotion VirtualBox package if you don’t have VirtualBox installed.
Step 4: Install Genymotion and set it up.
Step 1.2: Install ADB (Android Debug Bridge)
ADB is included in the Android SDK Platform Tools. Follow the steps below to install it on different operating systems:
Ubuntu & Kali Linux
Method 1: Install ADB Tools
Step 1: Open the terminal and run:
sudo apt update
sudo apt install android-tools-adb
Step 2: Verify installation:
adb versionMethod 2: Install the Full Android SDK
Step 1: Open the terminal and run:
sudo apt update
sudo apt install android-sdk
Step 2: Verify installation:
adb versionWindows
Step 1: Download ADB from Android Developer’s official site.
Step 2: Extract the downloaded ZIP file to a preferred location.
Step 3: Open Command Prompt (cmd) and navigate to the extracted folder using:
cd path\to\platform-toolsStep 4: Verify installation:
adb versionMacOS
Step 1: Install using Homebrew:
brew install android-platform-toolsStep 2: Verify installation:
adb versionStep 1.3: Install Burp Suite (For Intercepting Network Traffic)
Step 1: Download Burp Suite from PortSwigger’s official website.
Step 2: Install and launch Burp Suite.
Step 2: Setting Up Genymotion
Step 1: Open Genymotion.
Step 2: Click Add to create a new virtual device.
Step 3: Choose a device with Android 11 or below (Android 13 and 14 do not support root access by default in Genymotion).

Step 4: Start the virtual device and allow it to fully boot up.
Step 3: Configure Burp Suite
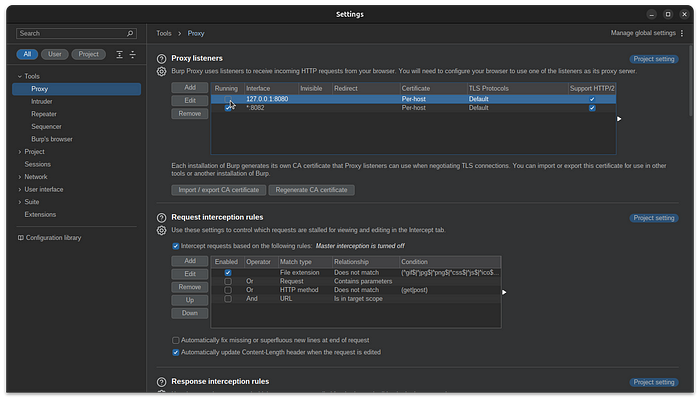
Step 3.1: Setup Proxy Listener
Step 1: Open Burp Suite.
Step 2: Navigate to Proxy > Proxy Settings.


Step 3: Click Add to create a new proxy listener.

Step 4: Assign a port number (e.g., 8082 or any desired port).
Step 5: Select All Interfaces, then click OK and Save.

Step 6(Optional): Deselect any other proxy settings that are enabled, except for the newly added proxy to prevent conflicts.
Step 3.2: Export Burp Certificate
Step 1: In Burp Suite, go to Proxy > Proxy Settings.
Step 2: Click Export Certificate.

Step 3: Select Certificate in DER format and click Next.

Step 4: Choose a file path and name the certificate (e.g., burp.der).

Step 4: Connecting ADB to Genymotion
Step 1: Start your Genymotion emulator.
Step 2: Run the following command to list available devices:
adb devicesStep 3: Identify the device to connect and run:
adb connect <Device IP address and Port>eg: adb connect 127.0.0.1:6562
Step 4: Configure proxy settings:
adb shell settings put global http_proxy localhost:3333
adb reverse tcp:3333 tcp:8082
Step 5: Install Burp Certificate on Genymotion
Step 5.1: Convert Burp Certificate
Step 1: Navigate to the directory where burp.der was exported. Step 2: Convert the certificate to PEM format:
openssl x509 -inform DER -in burp.der -out burp.pemStep 3: Generate the subject hash:
openssl x509 -inform PEM -subject_hash_old -in burp.pem | head -1Step 4: Rename the PEM file using the generated hash (example hash: 9a5ba575):
mv burp.pem 9a5ba575.0Step 5.2: Push Certificate to Genymotion
Step 1: Enable root access:
adb root
adb remount
Step 2: Push the certificate file:
adb push 9a5ba575.0 /system/etc/security/cacertsStep 3: Open an ADB shell:
adb shellStep 4: Set proper permissions:
chmod 644 /system/etc/security/cacerts/9a5ba575.0Step 5: Reboot the Genymotion device.
adb rebootStep 6: Final Steps
After rebooting, reconfigure the proxy settings:
adb shell settings put global http_proxy localhost:3333
adb reverse tcp:3333 tcp:8082
Now your Genymotion emulator is set up to work with Burp Suite! You should now be able to intercept and analyze network traffic.
Step 7: Troubleshooting Tips
- If ADB does not recognize the device: Ensure the emulator is running and try reconnecting using
adb connect <Device IP Address : Ports> - If the certificate is not recognized: Verify that the correct hash is generated and used in renaming the PEM file.
- If network traffic is not being captured: Ensure no other proxy settings are interfering in Burp Suite.
- Check if the proxy is enabled in Burp Suite: Sometimes, Burp Suite may automatically unselect the proxy setting created with the “All Interfaces” option for mobile. Go to Proxy > Proxy Settings and ensure your configured proxy is still active.
- For persistent proxy settings: You may need to reapply proxy commands after each emulator reboot.
Conclusion
This setup allows you to intercept and analyze network traffic on your Genymotion emulator using Burp Suite. If you encounter any issues, double-check the ADB connection and the placement of the certificate in the security directory.
🚀 Happy testing!
By thowfickofficial